PCFreak Logo (c) Der PCFreak

Archive for the 'Windows' Category


Dropbox Uploader für die Windows Shell – cmd.exe 2

Aktualisierung vom 20.09.2012.

Dropbox hat seine API geändert. Der Zugriff muss nun per Token erfolgen. Andrea Fabrizi hat wie immer ein tolls Script für Linux geschrieben. Danke der Hilfe von Drazen Petrek kann man nun Andrea’s Skript direkt auch unter Windows verwenden. Es ist lediglich eine minimale Cygwin-Umgebung und eine kleine Batch-Datei notwendig.

Alle notwendigen Files habe ich zusammengezippt und sie hier zum Download bereitgestellt.

PCFreak 2012

Dieser Artikel wurde bereits im Juni 2011 geschrieben und ist nicht mehr gültig!
Kürzlich musste ich auf der Kommandozeile (unter Windows) etwas in eine Dropbox laden. Ich fand jedoch nur ein BASH-Skript (Linux) von Andrea Fabrizi im Dropbox Wiki. Also musste ich mir selbst was schreiben. Einige Tage später hatte ich es geschafft, eine Batch-Datei zu basteln, die unter Zuhilfename einiger freier Tools (curl.exe|grep.exe|sed.exe|tr.exe|libeay32.dll|libiconv2.dll|libintl3.dll|libssl32.dll|pcre3.dll|regex2.dll) in der Lage ist einen Dropbox Upload aus einer cmd.exe heraus zu tätigen.

Ich habe das Skript im Dropbox Addon Wiki veröffentlicht, ihr könnt hier die Details nachlesen.

Install Windows Server 2008 R2 to a different drive letter than C: 2

This blog entry will show how to do a native install of Windows Server 2008 R2 to a different driveletter with a minimum effort. You only need a thumbdrive, a text-editor and a Windows Server 2008 R2 DVD (it should also work with Windows 7).

On your thumbdrive (USB-Stick) create a file named „AutoUnattended.xml“ with the following content:

<!–?xml version=“1.0″ encoding=“utf-8″?–>
<unattend xmlns=“urn:schemas-microsoft-com:unattend“>
<settings pass=“windowsPE“>
<component name=“Microsoft-Windows-Setup“ processorarchitecture=“amd64″ publickeytoken=“31bf3856ad364e35″ language=“neutral“ versionscope=“nonSxS“ xmlns:wcm=“http://schemas.microsoft.com/WMIConfig/2002/State“ xmlns:xsi=“http://www.w3.org/2001/XMLSchema-instance“>
<diskconfiguration>
<willshowui>OnError</willshowui>
<disk wcm:action=“add“>
<createpartitions>
<createpartition wcm:action=“add“>
<order>1</order>
<size>500</size>
<type>Primary</type>
</createpartition>
<createpartition wcm:action=“add“>
<extend>true</extend>
<order>2</order>
<type>Primary</type>
</createpartition>
</createpartitions>
<modifypartitions>
<modifypartition wcm:action=“add“>
<active>true</active>
<format>NTFS</format>
<label>System Reserved</label>
<order>1</order>
<partitionid>1</partitionid>
</modifypartition>
<modifypartition wcm:action=“add“>
<format>NTFS</format>
<label>SYSTEM</label>
<letter>M</letter>
<order>2</order>
<partitionid>2</partitionid>
</modifypartition>
</modifypartitions>
<diskid>0</diskid>
<willwipedisk>true</willwipedisk>
</disk>
</diskconfiguration>
<imageinstall>
<osimage>
<installto>
<diskid>0</diskid>
<partitionid>2</partitionid>
</installto>
<willshowui>OnError</willshowui>
</osimage>
</imageinstall>
<userdata>
<accepteula>true</accepteula>
</userdata>
</component>
</settings>
</unattend>

You can download the file here
Make sure, you change the line

  <letter>M</letter>

to your needs, where M is the drive letter you want to assign to the system partition. Save the file and attach the thumbdrive to the target computer.

Insert the Windows Server 2008 R2 DVD in the target computer and boot into setup.

At the first screen press Shift + F10 to open a command prompt

Determine which drive letter your thumbdrive has using diskpart.

Copy the file AutoUnattended.xml from your thumbdrive to RamDisk and start a second instance of setup.exe that will use our AutoUnattended.xml file.

.\setup.exe /unattend:X:\Sources\AutoUnattended.xml

A new instance of setup.exe will start using our custom installation file.

Continue with the setup as usual.

After setup is complete you can see the result. Windows is installed on drive M: . My thumbdrive uses the next available driveletter which is C: and the DVD is on the next free one which is D:.
Mission accomplished – Congratulations!

Why are we doing this? – Well, if you setup a Remote Desktop Services presenting Seamless RemoteApps it is very convenient for your users to have their local drived mapped with the same driveletters. If the operating system is on M: the local drives you bring into the Remote Desktop session start enumerating at C: . I know that there is a better way doing this with the „Windows Automated Installation Kit (AIK)“ but I didn’t want to install that big software and mess arround with .wim images.

If you find this entry useful, feel free to write a comment.

Shoets – Screenshot utility for the logon screen Kommentare deaktiviert für Shoets – Screenshot utility for the logon screen


Have you ever wanted to create a screenshot of the Windows(R) Logon Screen? – Impossible?

No, with Shoets, a small utility I wrote using the AutoIt programming language you can easily create screenshots at the Windows(R) logon screen.

You can get the tool here (source included): shoets-screenshooter-for-logon-screen.zip

  1. Unzip the archive
  2. Run Shoets.exe
  3. Lock your computer
  4. On XP and 2003 press 5x „SHIFT“ on your keyboard
    On other OSs click the „Ease of Access button“
  5. Press „s“ as often as you like to create a screenshot
  6. Press „x“ to exit the utility
  7. Login back to windows and enjoy your screenshots!

I will be interested in your feedback!

Howto compile oathtool on Windows with Cygwin 2


If you want to compile oathtool on Windows using Cygwin you can use this small Howto:

    1. Install Cygwin
    2. Install the following packages into Cygwin (maybe you need less packages, but this is myy actual list grabbed with cygcheck.exe -c) or just try, wait for errors and install the packages based on the error you get._autorebase, _update-info-dir, alternatives, autobuild, autoconf, autoconf2.1, autoconf2.5, automake, automake1.10, automake1.11, automake1.4, automake1.5, automake1.6,
      automake1.7, automake1.8, automake1.9, base-cygwin, base-files, bash, binutils, bzip2, ca-certificates, coreutils, cpio, crypt, cvs, cvsps, cygutils, cygwin, cygwin-doc, dash,
      diffutils, dos2unix, editrights, file, findutils, gawk, gcc-core, gcc-g++, gcc-mingw-core, gcc-mingw-g++, gdb, gettext, git, grep, groff, gzip, ipc-utils, less, libasn1_8, libattr1,
      libbz2_1, libcom_err2, libcurl4, libdb4.5, libexpat1, libffi4, libgcc1, libgcrypt11, libgdbm4, libgmp3, libgnutls26, libgpg-error0, libgssapi3, libheimbase1, libheimntlm0, libhx509_5,
      libiconv2, libidn11, libintl3, libintl8, libkrb5_26, libltdl7, liblzma5, liblzo2_2, libncurses10, libncurses9, libncursesw10, libopenldap2_3_0, libopenssl098, libopenssl100, libpcre0,
      libpopt0, libreadline7, libroken18, libsasl2, libsigsegv2, libsqlite3_0, libssh2_1, libssp0, libstdc++6, libtasn1_3, libtool, libwind0, login, m4, make, man, mercurial, mingw-runtime,
      mingw-w32api, mintty, perl, perl-Error, python, rebase, run, sed, tar, terminfo, texinfo, tzcode, w32api, wget, which, xorg-util-macros, xz, zlib0
    3. Download the source from here. I used oath-toolkit-1.12.4.tar.gz
    4. Unzip the source to your Cygwin home folder
      tar xzvf oath-toolkit-1.12.4.tar.gz
    5. Jump into the newly created folder
      cd  oath-toolkit-1.12.4
    6. Execute the following commands
      ./configure
      make
    7. Pickup the following files and copy them to a separate folder
      <cygwinbinfolder>\cygwin1.dll
      <cygwinhome>\oath-toolkit-1.12.4\liboath\.libs\cygoath-0.dll
      <cygwinhome>\oath-toolkit-1.12.4\\oathtool\.libs\oathtool.exe
    8. You can now run oathtool (without Cygwin) from the newly created folder


If you don’t want to compile yourself, you can download my compiled version here (if you trust me!).

Google-Authenticator – a nice and flexible tool! Kommentare deaktiviert für Google-Authenticator – a nice and flexible tool!

I recently wrote a lot of documentation about the Google-Authenticator, how to use it with PAM or RADIUS and how to implement a Freeradius-Proxy to be able to use Google-Authenticator in addition to your current RADIUS setup.

Feel free to take a look at my public Wiki to read more about:

Here are some nice screenshots to the above contents:

Google-Authenticator iPhone App

Custom Webmin Module for Google-Authenticator

Different Windows Clients


VirtualBox VRDP Verbindung klappt nicht Kommentare deaktiviert für VirtualBox VRDP Verbindung klappt nicht

Ich bin hier unter Windows 7 Professional (64bit) auf ein kleines Problem gestoßen und zwar habe ich hier mit VirtualBox eine virtuelle Maschine am Laufen, die per NAT ans Netzwerk angeschlossen ist. Ich habe das VRDP aktiviert und  den Port 3390 gewählt, damit sich VRDP nicht mit meinem lokalen Port 3389 in die Haare kommt.

Trotz dieser Vorkehrungen konnte ich von der physikalischen Maschine (Win7) nicht per RDP in die virtuelle Maschine verbinden (127.0.0.1). Windows 7 bringt dabei immer die Fehlermeldung, dass man bereits eine Verbindung hätte: „Your computer could not connect to another console session on the remote computer because you already have a console session in progress.“

Da ich die Netzwerkkarte der virtuellen Maschine im sogenannten „NAT-Modus“ betreibe, dachte ich eine Verbindung auf 127.0.0.1 auf Port 3390 sollte klappen, weit gefehlt. Windows 7 bemerkt, dass man eine RDP-Verbindung auf den eigenen Rechner machen möchte und bricht mit obiger Fehlermeldung ab. – Was kann man tun?

Die Lösung ist ganz einfach, man benutzt anstatt der Adresse 127.0.0.1 (localhost) einfach die Adresse 127.0.0.2 und schon klappts. Endlich wieder saubere RDP-Verbindungen in die virtuellen Maschinen aufbauen!

Audiograbber und Mp3Tag unter Linux 2

Audiograbber und Mp3tag sind meiner Meinung nach zwei Programme, die man im Umgang mit MP3-Dateien unbedingt benötigt. Mit Audiograbber kann man aus Musik-CDs oder Musikdateien MP3-Dateien erstellen. Mp3tag ist ein sehr komfortables Programm, um die Tags der MP3-Dateien zu ändern, MP3-Dateien umzubenennen uvm.

Da ich mittlerweile privat fast ausschließlich mit Linux arbeite, mir die obigen Programme jedoch sehr ans Herz gewachsen sind, hier eine kurze Anleitung wie man diese Programme mit WINE unter Linux (in meinem Fall Kubuntu 11.10) problemlos zum Laufen bekommt.

Zunächst benötigen wir die Setup-Dateien für Audiograbber, Mp3tag und das Lame-Plugin für Mp3tag, diese gibt es über die Homepages der beiden Tools:

  Audiograbber http://www.audiograbber.de
  Mp3tag http://www.mp3tag.de/

Im Detail sind das dann folgende Dateien:

Audiograbber
agsetup183se.exe

Lame Plugin für Audiograbber
lameplugin_setupX86.exe oder lameplugin_setupX64.exe

Mp3tag
mp3tagv250setup.exe

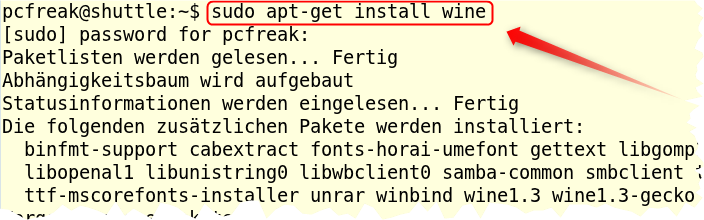
Um die obigen Windows Programme unter Linux zu installieren muss zunächst WINE installiert werden. Mit WINE können viele Windows Programme unter Linux installiert und ausgeführt werden.

Der Befehl

  sudo apt-get install wine

in einem Terminal installiert WINE

WINE arbeitet mit sogenannten „Flaschen“, man kann sich diese „Flaschen“ als jeweils separate Windows-Instanzen vorstellen. Dadurch ist es z.B. möglich, 2 Windows-Programme, die sich nicht „vertragen“ in jeweils separate „Flaschen“ zu installieren oder mehrere Windows-Programme die sich untereinander nicht beeinflussen in eine „Flasche“ zu packen. Ich trenne meine „Flaschen“ gerne nach Aufgabengebiet. Da sich Audiograbber und Mp3tag problemlos vertragen, möchte ich sie beide in eine „Flasche“ installieren. Diese „Flasche“ soll im Ordner /home/pcfreak/winprogs/mp3 liegen, also lege ich diesen Ordner mit folgendem Befehl in einem Terminal an:

  mkdir -p /home/pcfreak/winprogs/mp3

Um WINE mitzuteilen, dass es den soeben angelegten Ordner als Ordner für eine „Flasche“ benutzen soll, muss man die Variable WINEPREFIX vor der Installation von Programmen definieren. Folgender Befehl übernimmt dies für den soeben angelegten Ordner:

  export WINEPREFIX=/home/pcfreak/winprogs/mp3

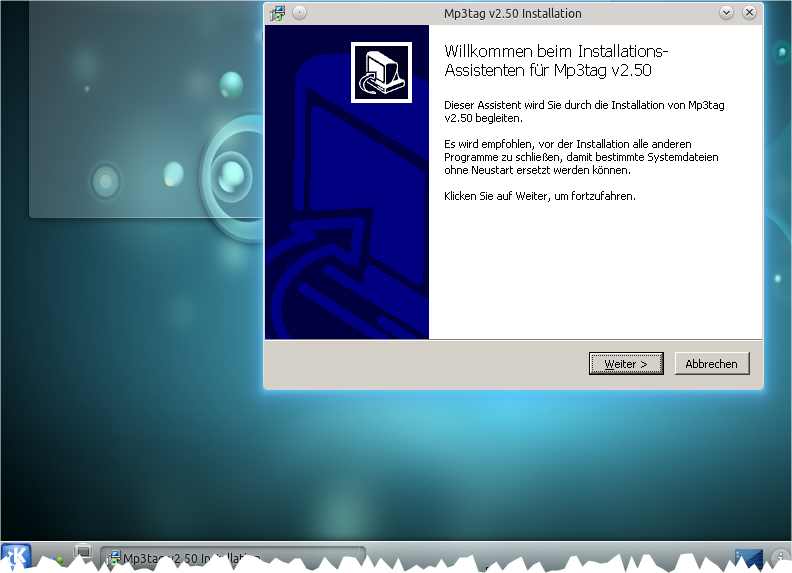
Nun können wir mit der Installation beginnen. Wir beginnen mit Mp3tag. Die Befehle werden wieder in einem Terminal eingegeben und wenn das grafische Setup von Mp3tag startet, bedienen wir es wie wenn wir das Programm unter Windows installieren würden.

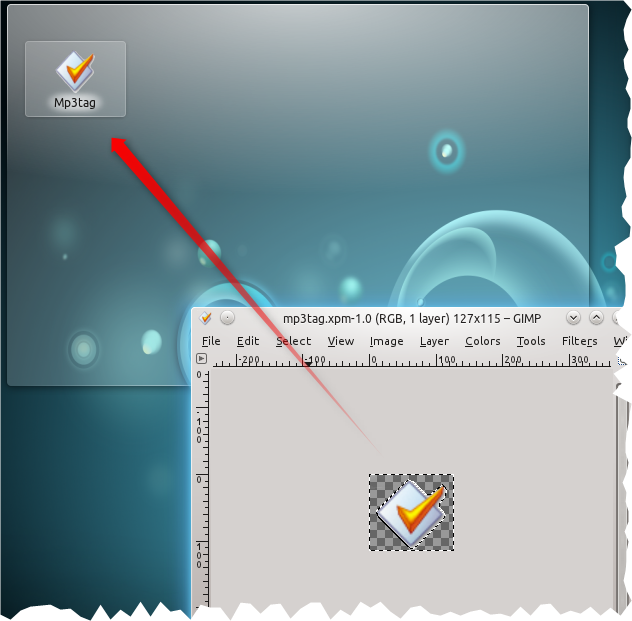
Mit der auf dem Desktop erstellten Verknüpfung kann man nun Mp3tag starten. Wer das Ganze noch mit einem schönen Icon versehen möchte, der muss eben selbst Hand anlegen und für die Desktop-Verknüpfung schnell mit The Gimp ein Symbol erstellen.

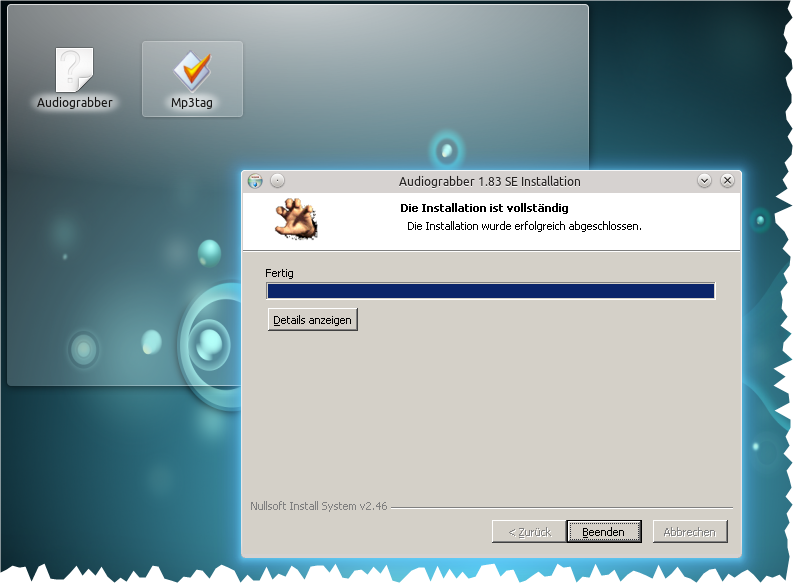
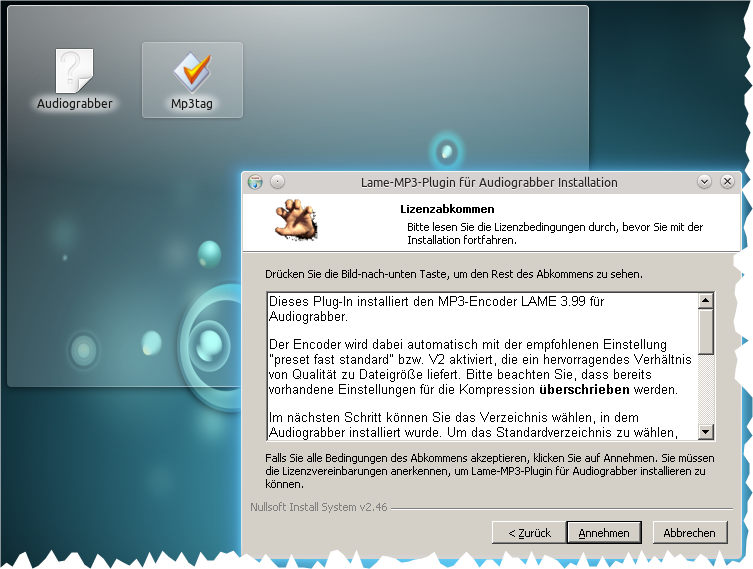
Da wir nun wissen, wie man ein Windows-Programm mittels WINE installiert, führen wir nun die Installation von Audiograbber und dem Lame-Mp3-Plugin auf die gleiche Weise durch:

Nun noch das Lame-Plugin für Audiograbber:

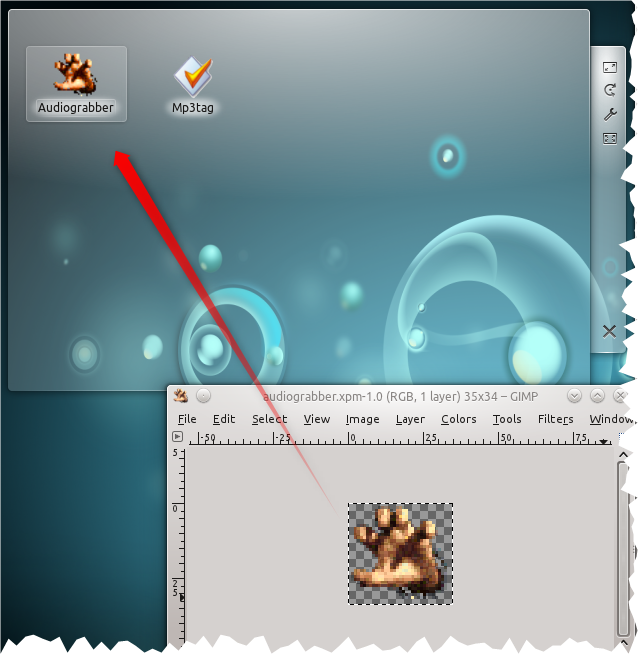
Auch für Audiograbber habe ich mir selbst ein Symbol erstellt und es für die Desktop-Verknüpfung verwendet:

Beide Programme lassen sich nun problemlos vom Kubuntu Desktop starten und verwenden!

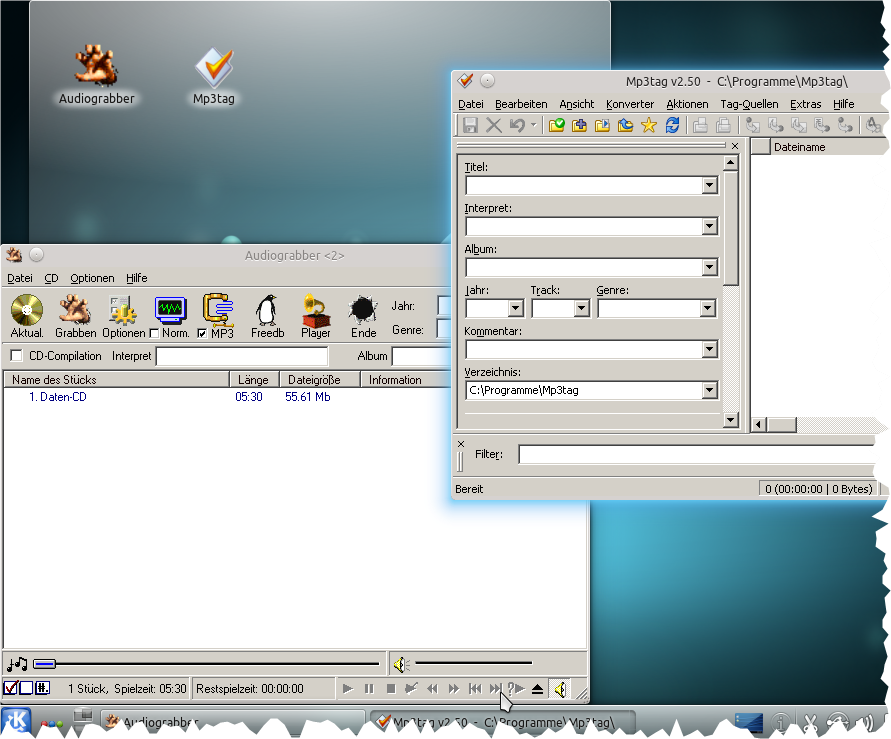
Beide Programme funktionieren wirklich einwandfrei. Mit Audiograbber kann problemlos aus WINE heraus das CD-Rom zum „grabben“ von Audio angesprochen werden. Innerhalb der Windows-Programme stehen die wichtigsten Ordner als Links zu den Ordnern in Kubuntu (Musik, Bilder usw.) bereit, sodass man sich schnell zurechtfindet.

Top Screenshot und Screenrecording Software 1

Ich möchte kurz auf ein super Programm hinweisen, welches mir von meinem Arbeitskollegen empfohlen wurde. Ich bin total begeisert. Das besagte Programm heißt Screenpresso und ist für Windows.
Man kann damit nicht nur Screenshots machen, sondern auch Videos (Freeversion nur 20 Sekunden). Nahezu alle Funktionen sind uneingeschränkt privat und kommerziell nutzbar. Hier sind die Features aufgelistet und die Free- und Proversion gegenübergestellt.

Hier das Feature Video auf Youtube.


Endlich mal eine Software die sehr viele Funktionen aufgeräumt und mit einem tollen UI unter einen Hut bekommt.

Ich habe mir Screenpresso Pro bestellt, da ich die Videofunktion sehr gut gebrauchen kann!

PAExec – PsExec zum Verteilen Kommentare deaktiviert für PAExec – PsExec zum Verteilen

Fast jeder Administrator kennt das Tool PsExec von Sysinternals (Mark Russinovich). Es hat leider 2 störende Probleme:

  • man darf es nicht mit eigenen Programmen distributieren
  • Benutzernamen und Passwörter werden im Klartext übergeben

Abhilfe schafft das kleine Programm PAExec, welches von jedermann heruntegeladen werden kann und explizit in OpenSource, Freeware und sogar kommerziellen Produkten eingesetzt werden darf.

PAExec kann hier heruntergeladen werden: http://www.poweradmin.com/PAExec/

Hier die Hilfe zum Programm:

Usage: PAExec [\\computer[,computer2[,…] | @file]][-u user [-p psswd][-n s][-l]
[-s|-e][-x][-i [session]][-c [-f|-v] [-csrc path]][-lo path][-rlo path][-ods]
[-w directory][-d][-][-a n,n,…][-dfr] cmd [arguments]

Standard PAExec\PsExec command line options:

-a Separate processors on which the application can run with commas where 1 is the lowest numbered CPU. For example, to run the application on CPU 2 and CPU 4, enter:
-a 2,4
-c Copy the specified program to the remote system for execution. If you omit this option the application must be in the system path on the remote system.
-d Don’t wait for process to terminate (non-interactive).
-e Does not load the specified account’s profile.
-f Copy the specified program even if the file already exists on the remote system.
-i Run the program so that it interacts with the desktop of the specified session on the specified system. If no session is specified the process runs in the console session.
-h [NOT IMPLEMENTED] If the target system is Vista or higher, has the process run with the account’s elevated token, if available.
-l [EXPERIMENTAL] Run process as limited user (strips the Administrators group and allows only privileges assigned to the Users group). On Windows Vista the process runs with Low Integrity.
-n Specifies timeout in seconds connecting to remote computers.
-p Specifies optional password for user name. If you omit this you will be prompted to enter a hidden password.
-s Run the process in the System account.
-u Specifies optional user name for login to remote computer.
-v Copy the specified file only if it has a higher version number or is newer on than the one on the remote system.
-w Set the working directory of the process (relative to remote computer).
-x Display the UI on the Winlogon secure desktop (local system only).
-priority Specifies -low, -belownormal, -abovenormal, -high or -realtime to run the process at a different priority. Use -background to run at low memory and I/O priority on Vista.
computer Direct PAExec to run the application on the remote computer or computers specified. If you omit the computer name PAExec runs the application on the local system, and if you specify a wildcard (\\*), PAExec runs the command on all computers in the current domain.
@file PAExec will execute the command on each of the computers listed in the file.
program Name of application to execute.
arguments Arguments to pass (note that file paths must be absolute paths on the target system).

Additional options only available in PAExec:

-cnodel If a file is copied to the server with -c, it is normally deleted (unless -d is specified). -cnodel indicates the file should not be deleted.
-csrc When using -c (copy), -csrc allows you to specify an alternate path to copy the program from. Example: -c -csrc „C:\test path\file.exe“
-dbg Output to DebugView (OutputDebugString)
-dfr Disable WOW64 File Redirection when launching the new process
-lo Log Output to file. Ex: -lo C:\Temp\PAExec.log
The file will be UTF-8 with a Byte Order Mark at the beginning.
-rlo Remote Log Output: Log from remote service to file (on remote server).
Ex: -rlo C:\Temp\PAExec.log
The file will be UTF-8 with a Byte Order Mark at the beginning.

The application name, copy source, working directory and log file entries can be quoted if the path contains a space. For example:
PAExec \\test-server -w „C:\path with space“ „C:\program files\app.exe“

Input is sent to the remote system when Enter is pressed, and Ctrl-C stops the remote process and stops PAExec.

PsExec passes all parameters in clear-text. In contrast, PAExec will scramble the parameters to protect them from casual wire sniffers, but they are NOT encrypted. Note that data passed between PAExec and the remote program is NOT scrambled or encrypted — the same as with PsExec.

PAExec will return the error code it receives from the application that was launched remotely. If PAExec itself has an error, the return code will be one of:
-1 = internal error
-2 = command line error
-3 = failed to launch app (locally)
-4 = failed to copy PAExec to remote (connection to ADMIN$ might have failed)
-5 = connection to server taking too long (timeout)
-6 = PAExec service could not be installed/started on remote server
-7 = could not communicate with remote PAExec service
-8 = failed to copy app to remote server

Windows 7 Profilordner komplett auf anderes Laufwerk legen 4

Junction to moved user folder

Windows 7 unterstützt wie seine Vorgänger die Option, z.B. den Ordner für Eigene Dateien in der grafischen Benutzeroberfläche zu verschieben. Da im Benutzerprofil (z.B. C:\Users\<benutzername> aber auch viele Konfigurationsdateien für Anwendungen liegen, diese jedoch nicht so einfach verschoben werden können, hier kurz ein Weg, wie es trotzdem klappt.

  1. Bevor wir beginnen muss am laufenden System festgestellt werden, wo sich derzeit der Profilordner befindet (z.B. C:\Users)
    und wo er später hin soll (z.B. D:\Users)
  2. Mit der Windows 7 CD in den Wiederherstellungskonsole booten und die Eingabeaufforderung wählen
  3. Feststellen, auf welchem Laufwerksbuchstaben NUN das installierte Windows liegt, in meinem Fall war es D:\ (D:\ in der WHK ist also C:\ im laufenden Betrieb)
    ggf. mit diskpart –> list vol auslesen
  4. Feststellen, auf welches Laufwerk wir die Benutzerprofile verschieben wollen, in meinem Fall war es E:\ (E:\ in der WHK ist also D:\ im laufenden Betrieb)
    ggf. mit diskpart –> list vol auslesen
  5. Mit robocopy die Profile kopieren
    robocopy D:\Users E:\Users /mir /xj /copyall
    (/xj ist extrem wichtig, dadurch werden Junction Points NICHT mitkopiert)
  6. Sicherstellen, dass die Dateien erfolgreich kopiert wurden
  7. D:\User umbenennen in D:\Users.bck (REN D:\Users D:\Users.bck)
  8. Link anlegen
    Die Problemstellung ist, dass wir eine „Directory Junction“ anlegen müssen. Diese kann aber nur mit tatsächlich vorhandenen
    Pfaden angelegt werden. Also erzeugen wir uns ggf. per SUBST einen Laufwerksbuchstaben um damit zu arbeiten.
    Je nach der aktuellen Laufwerkskonfiguration geht es auch ohne SUBST. In meinem Fall war das möglich, da ich ja ein Laufwerk D: in der Wiederherstellungskonsole verfügbar hatte.
  9. MKLINK D:\Users D:\Users /j
    weil im Moment (Wiederherstellungskonsole) C:\Users auf D:\Users liegt, jedoch bei gebootetem Windows auch wieder
    auf D:\Users zeigen soll!
  10. Wiederherstellungskonsole verlassen und Windows 7 wieder normal booten.
  11. Wenn die Anmeldung klappt, hat es funktioniert, ansonsten zurück in die Wiederherstellungskonsole und weiter üben!
  12. Den Ordner C:\Users.bck löschen.

« Vorherige SeiteNächste Seite »