VirtualBox eigenes BIOS-Logo erstellen und einbinden Kommentare deaktiviert für VirtualBox eigenes BIOS-Logo erstellen und einbinden
VirtualBox zeigt beim Start einer VM immer kurz das VirtualBox Logo an. Es gibt die Möglichkeit, ein selbst erstelltes Logo anzuzeigen. Ich beschreibe hier in kurzen Schritten, wie man ein Logo mit GIMP erstellt und wie man es dann in eine existierende VM einbindet.
-
Erstellen des Logos (640×480 72dpi RGB)
In GIMP (englisch): File –> New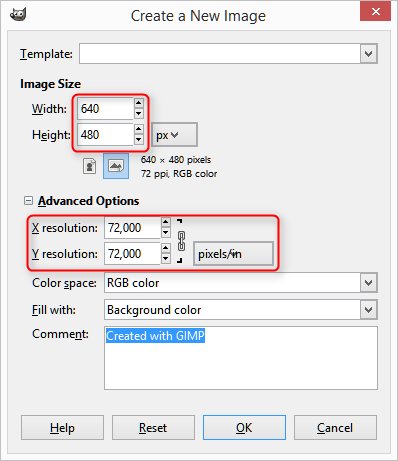
-
Bild bearbeiten
-
Export des Bildes
In GIMP (englisch):
File –> Export –> <filename.bmp> –> Export
Im darauf folgenden Dialog folgende Einstellungen durchführen: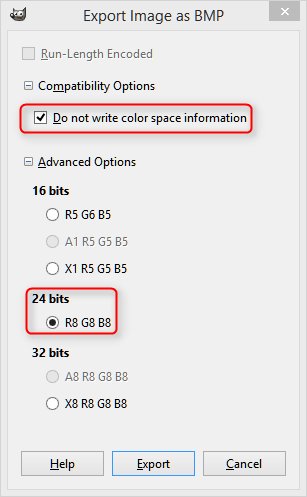
Das Bild legt man am besten im Ordner der virtuellen Maschine ab.
- Einbinden des Logos in die VM
Die Einbindung des Logos in eine VM erfolgt über die Kommandozeile. Wir benutzen dazu das Kommando „vboxmanage“. Es unterstützt folgende Optionen die für das Einbinden eines BIOS-Logos zuständig sind:[--bioslogofadein on|off]
[--bioslogofadeout on|off]
[--bioslogodisplaytime <msec>]
[--bioslogoimagepath <imagepath>]
! Wichtig ! Bei der Angabe des Logos muss der komplette Pfad angegeben werden, leider funktionieren hier keine relativen Pfade.
Möchte man also einer virtuellen Maschine mit der Bezeichnung „Win8“ ein BIOS-Logo mit dem kompletten Pfad V:\VMs\windows8\bootlogo.bmp für 3 Sekunden (3000ms) beim Start der VM anzeigen lassen und noch einen schönen Ein- und Ausblendeeffekt erreichten muss man folgenden Befehl absetzen:vboxmanage modifyvm "Win8" --bioslogoimagepath "V:\VMs\windows8\bootlogo.bmp" --bioslogofadein on --bioslogofadeout on --bioslogodisplaytime 3000 - Test
Nun sollte beim nächsten Start der entsprechenden VM das von uns erstellte Logo angezeigt werden.