
Remote Assistance with Windows
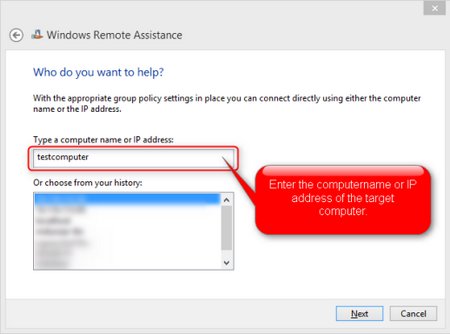
Since Windows 7 there is a small utility included with the OS called „Windows Remote Assistance“. If you enable it, someone from another machine can execute
msra /offerra
enter your IP address or hostname and can then view and optionally use your desktop (both see everything). Behind the scenes the Microsoft RDP protocol is used which is very stable and performant.
If you are on a domain network your system administrator can enable the Remote Assistance feature on the entire domain, so every user can support another user on demand. What a nice feature! There is no longer a need for 3rd party Remote Control Software to be placed on the clients in your domain, just use what the operating system provides.
The prerequisites are:
Connecting Computer
- Remote Assistance allowed (e.g. via Group Policy or manually)
- Microsoft® Windows® Vista or higher
Target Computer
- Remote Assistance allowed (e.g. via Group Policy or manually)
- Microsoft® Windows® XP or higher (including Server products)
- Computer reachable via TCP/IP on port 3389
When offering Remote Assistance to a terminal server (e.g. Server 2008R2) the connecting computer (the guy who wants to help) gets a drop-down list of all users on the server and can select the one who needs help. In this case you can individually support users also on large terminal server installations! To also be able to offer Remote Assistance from the Terminalserver to other users you have to install the „Remote Assistance“ Feature on the server.
As you can see here, it is very easy!
One small problem is the file transfer feature. It has been removed by Microsoft since Windows 7. See the following list:
File Transfer option with Remote Assistance
Windows® XP –> Windows® XX
Filetransfer works
Windows Vista –> Windows® XX
Filetransfer works
Windows® 7 or higher –> Windows® XX
File transfer is no longer implemented
ShowHotCorner for Server 2012 and Windows 8
At work I recently started to use Server 2012 as a service platform. I am in general not a friend of the new Microsoft Metro UI but I had to deal with it. One problem I immediately run across was how to access the „Run Dialog“ to quickly startup programs.
As I found out, you have to point your mouse to the bottom left corner, the so called „Hot Corner“, then right-click on it to get some of the useful administrative tools like the run dialog or an administrative CMD prompt. No big deal and easy to remember. Btw. If you are directly working on the machine Win + X brings up this menu immediately but Win+X does not work in a Remote Desktop Session.
The only problem I had using the hot corner was that I use a Remote Desktop Manager to access all the machines I maintain and I do not work in full screen all the time. When trying to access the „Hot Corner“ I always moved the mouse out of the Remote Desktop Window and after about 10x doing so I thought about a solution.
At the beginning it tried it with AutoHotKey and attempted to emulate Win+X but it seems, Microsoft interrupts somehow the usage of the Windows key on the newer operating systems.
Then I created a small executable with my favourite scripting language AutoIT that does automatically move the mouse to the bottom left corner, activates the „Hot Corner“ and right-clicks for me. I gave it a wonderful icon that fits very nice into the new Server 2012 UI, pinned it to the taskbar and moved it left most.
Now I can just click on this button and immediately the Win+X menu appears. As an administrator it helps me a lot to do my daily work faster.
Feel free to download this tool called „ShowHotCorner“. It comes with the source code and also pre-compiled x86/x64 versions.
Watch the video below to see the installation process and the tool in action.
Spruch des Tages
Weiser Spruch
Online lernen – Links April 2013
Windows Explorer – Change the OpenFolder Icon
Since Windows Vista (Server 2008) Microsoft changed the OpenFolder Icon. When using Explorer or Regedit, it is visually hard to find which folder (or registry key) is currently opened. – But there is an easy solution. Just select your favourite icon for open folders, copy it to your system (e.g. %systemroot%) and then change the Default Icon for OpenFolders via registry by pointing to your new icon. You can do this with this command or manually via the registry
reg ADD „HKLM\SOFTWARE\Microsoft\Windows\CurrentVersion\explorer\Shell Icons“ /t REG_SZ /v 4 /d ^%systemroot%^\openfolder.ico
After the change, make sure you restart Explorer.exe with the following command(s)
taskkill /f /im „explorer.exe“ && explorer.exe
You should now have a wonderful new icon for OpenFolders and you will have no longer any trouble to detect the current open folder (or registry key).
Initiative-S

Mit dem Seiten-Check von Initiative-S (gefördert durch das Bundesministerium für Wirtschaft und Technologie im Rahmen der Task Force „IT-Sicherheit in der Wirtschaft“) kann man seite Webseite bequem und kostenfrei prüfen und monitoren lassen.
Schwerpunkt ist hierbei Sicherheitslücken oder bereits stattgefundene Modifikationen (z.B. an WordPress etc.) festzustellen und per E-Mail zu melden.
Für die Anmeldung muss eine der folgenden E-Mail-Adressen für die entsprechende Domain eingerichtet werden.
Einfach unter folgendem Link beim „Seitencheck“ anmelden: https://www.initiative-s.de
Natürlich bietet „Initiative-S“ den Dienst für Firmen auch käuflich an und man erhalt dann sogar ein Sicherheits-Siegel.
A StartButton for Windows 8
Ok, we should get rid of the Startbutton and I don’t really need it but sometimes a user asks for „special support“ and really needs it.
On this webpage I found an interesting idea howto create a Start Button, by using the „All Apps“ overview in the Metro UI.
Just compile this imple AutoHotKey-Script, add a nice icon during the compilation process and place the resulting executable somewhere on your harddisk and pin it to the taskbar.
#NoEnv ; Recommended for performance and compatibility with future AutoHotkey releases.
SendMode Input ; Recommended for new scripts due to its superior speed and reliability.
SetWorkingDir %A_ScriptDir% ; Ensures a consistent starting directory.
Send {LWin}
Sleep 90
Send {Lctrl down}
Sleep 20
Send {Tab}
Sleep 20
Send {Lctrl up}
![]()
You can download my source, executable, icon and HowTo here: Download
Sicherheit von SSL Servern testen
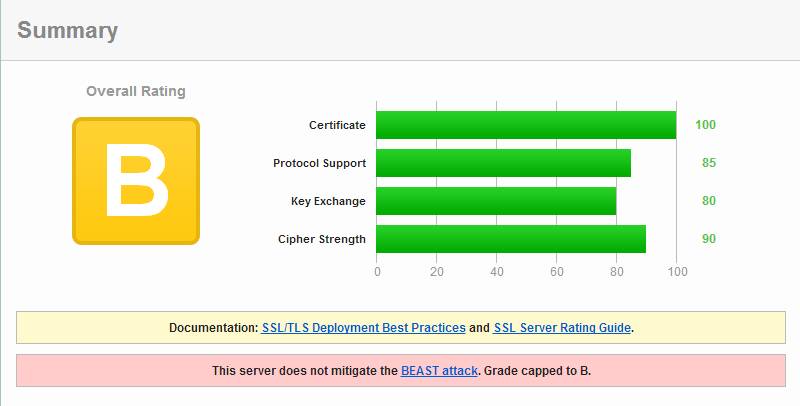
Auf dieser Internetseite wird ein „SSL Server Test“ bereitgestellt. Es werden
- Server Key und Zertifikat
- zusätzliche Zertifikate
- Zertifikatspfade
- Protokolle
- Chiffrier Suiten
- Protokoll Details
- uvm.
angezeigt und gegen den „Stand der Technik“ geprüft. Danach wird die Seite entsprechend mit einer amerikanischen Schulnote (A-F) bewertet. Man sollte aber auch die entsprechende Dokumentation lesen, um die Werte korrekt interpretieren zu können. Wer selber einen Webserver mit SSL ins Internet stellen möchte sollte sich mit den „Deployment Best Practices“ befassen.
Testen sie doch einfach mal ihre Bank!
Virtualbox change NAT DHCP Range
The Virtualbox IP range assigned by „NAT“ could interfer with your local IP range. If you want to change it from the default „10.0.x.x“ to „172.16.x.x“, shutdown the virtual machine and enter the following command.
VBoxManage.exe modifyvm „Linux Mint 14.1 x86 MATE“ –natnet1 „172.16/16“
Then restart your machine. It will now assing 172.16.x.x addresses from the „NAT“ DHCP pool.
To do this for all of your machines in one single step (on Windows) you can execute the following command:
for /f „usebackq delims={“ %a in (`VBoxManage.exe list vms`) do VBoxManage.exe modifyvm %a –natnet1 „172.16/16“
You can check your results on a running machine with the following command

There can be some other issues with DNS (independend of the above changes) in VMs using NAT. See the following article.
To quickly fix this either use the following command:
VBoxManage modifyvm „VMNAME“ –natdnshostresolver1 on
or modify the guests DNS settings to point to the same server as your host.
The IP range assinged to „Host-only Networks“ can be set via the GUI under „Global Preferences“