
SuSE Linux – Umzug von Promise Raid auf Vmware
PAExec – PsExec zum Verteilen
Windows 7 Profilordner komplett auf anderes Laufwerk legen
 Comments(4)
Windows 7 unterstützt wie seine Vorgänger die Option, z.B. den Ordner für Eigene Dateien in der grafischen Benutzeroberfläche zu verschieben. Da im Benutzerprofil (z.B. C:\Users\<benutzername> aber auch viele Konfigurationsdateien für Anwendungen liegen, diese jedoch nicht so einfach verschoben werden können, hier kurz ein Weg, wie es trotzdem klappt.
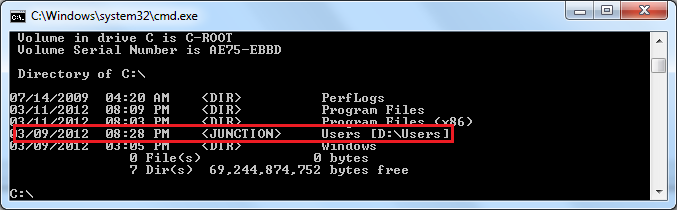
- Bevor wir beginnen muss am laufenden System festgestellt werden, wo sich derzeit der Profilordner befindet (z.B. C:\Users)
und wo er später hin soll (z.B. D:\Users) - Mit der Windows 7 CD in den Wiederherstellungskonsole booten und die Eingabeaufforderung wählen
- Feststellen, auf welchem Laufwerksbuchstaben NUN das installierte Windows liegt, in meinem Fall war es D:\ (D:\ in der WHK ist also C:\ im laufenden Betrieb)
ggf. mit diskpart –> list vol auslesen - Feststellen, auf welches Laufwerk wir die Benutzerprofile verschieben wollen, in meinem Fall war es E:\ (E:\ in der WHK ist also D:\ im laufenden Betrieb)
ggf. mit diskpart –> list vol auslesen - Mit robocopy die Profile kopieren
robocopy D:\Users E:\Users /mir /xj /copyall
(/xj ist extrem wichtig, dadurch werden Junction Points NICHT mitkopiert) - Sicherstellen, dass die Dateien erfolgreich kopiert wurden
- D:\User umbenennen in D:\Users.bck (REN D:\Users D:\Users.bck)
- Link anlegen
Die Problemstellung ist, dass wir eine „Directory Junction“ anlegen müssen. Diese kann aber nur mit tatsächlich vorhandenen
Pfaden angelegt werden. Also erzeugen wir uns ggf. per SUBST einen Laufwerksbuchstaben um damit zu arbeiten.
Je nach der aktuellen Laufwerkskonfiguration geht es auch ohne SUBST. In meinem Fall war das möglich, da ich ja ein Laufwerk D: in der Wiederherstellungskonsole verfügbar hatte. - MKLINK D:\Users D:\Users /j
weil im Moment (Wiederherstellungskonsole) C:\Users auf D:\Users liegt, jedoch bei gebootetem Windows auch wieder
auf D:\Users zeigen soll! - Wiederherstellungskonsole verlassen und Windows 7 wieder normal booten.
- Wenn die Anmeldung klappt, hat es funktioniert, ansonsten zurück in die Wiederherstellungskonsole und weiter üben!
- Den Ordner C:\Users.bck löschen.
Windows 7 Bootzeiten drastisch reduzieren
Windows 7 hat eine interne Optimierung, die mitunter die Bootzeiten drastisch reduziert. Leider kann es je nach Auslastung des Systems vorkommen, dass Windows diese Optimierung nie durchführt, da vor allem sehr ausgelastete Systeme eben nie „idle“ sind. Hier hilft es weiter, diesen Prozess manuell anzustarten:
start /wait Rundll32.exe advapi32.dll,ProcessIdleTasks
Nach einiger Wartezeit startet das System merklich schneller! Es empfielt sich übrigens auch, diesen Befehl auch vor dem Imagen einer Musterinstallation abzusetzen um allen zukünftigen Nutzern des Images bereits von Anfang an schnelle Bootzeiten zu ermöglichen.
Eine weitere Bremse können Netzlaufwerke sein.
Es kursiert das Gerücht, dass folgender Registry Key:
HKEY_CURRENT_USER\Software\Microsoft\Windows\CurrentVersion\Explorer\Advanced
DWORD 32bit
NoNetCrawling = 1
die Bootzeiten drastisch beschleunigen soll, leider ist das Gegenteil der Fall, Windows 7 bootet damit sogar noch langsamer, also einfach vergessen!
Stattdessen folgenden Registry-Key setzen, dieser stellt ein, dass Netzlaufwerke erst dann wieder verbunden werden, wenn man sie nutzt:
HKLM\SYSTEM\CurrentControlSet\Control\NetworkProvider
DWORD (32bit)
RestoreConnection = 0
Probiert es einfach mal aus, die obigen 2 Tipps beschleunigen den Bootvorgang wirklich!
open-vm-tools unter Debian Squeeze installieren
Fehlender Schlüssel HKCU\Software\Classes – ACCESS DENIED

Ich hatte das Problem, dass bei einem Windows 7 System der Schlüssel „HKEY_CURRENT_USER\Software\Classes“ nicht zugänglich war. Aufgefallen ist das aber erst bei der Installation eines neuen Programms. Da ich wegen der Fehleranalyse sowieso schon den Process Monitor von Sysinternals angeworfen hatte, dache ich mir, das Problem wirst du jetzt lösen.
Zunächst aber ein paar Hintergrundinformationen:
„HKEY_CURRENT_USER\Software\Classes“ ist kein Registry-Schlüssel sondern ein Registry-Link, der beim Anmelden des Benutzers durch die „Winlogon.exe“ erzeugt wird. Das kann man ganz leicht nachprüfen, da sich in der Datei „ntuser.dat“ (ruhig mal von einem anderen Account aus als Hive laden) dieser Schlüssel nicht befindet.
Der Registry Link „HKEY_CURRENT_USER\Software\Classes“ zeigt eigentlich auf „HKEY_USERS\<user-SID>_Classes“. „HKEY_USERS\<user-SID>_Classes“ wiederum kommt aus der Datei „%userprofile%\AppData\Local\Microsoft\Windows\UsrClass.dat“.
Nun also zurück zu meinem Problem:
Bei meinem Benutzeraccount fehlten sämtliche Unterschlüssel von „HKEY_CURRENT_USER\Software\Classes“. Der Schlüssel „HKEY_USERS\<user-SID>_Classes“ für diesen Benutzer war aber vorhanden und konnte mit einem administrativen Account eingesehen werden.
Ich vermutete ein Rechte-Problem und habe (während ich mit Process Monitor die Registry auf ACCESS_DENIED prüfte) einfach mal im Schlüssel „HKEY_USERS\<user-SID>_Classes“ versucht, die Berechtigungen komplett durchzuvererben.
Tatsächlich spuckte der Process Monitor bei einigen Schlüsseln einen „ACCESS_DENIED“-Fehler aus. In meinem Fall waren es einige Schlüssel unterhalb von „HKEY_USERS\<user-SID>_Classes\VirtualStore\MACHINE\SOFTWARE\Wow6432Node“.
Für die betroffenen Schlüssel musste ich zunächst den Besitz übernehmen und dann die Rechte abändern. Zum Schluss lief dann die Rechtevererbung ohne Fehler durch und der Process Monitor zeigte auch keine Probleme mehr an.
Zusätzlich habe ich noch überprüft, ob der Benutzer überhaupt Schreibrechte für die Datei „%userprofile%\AppData\Local\Microsoft\Windows\UsrClass.dat“ hat, das war der Fall.
Nachdem ich den Benutzer abgemeldet und neu angemeldet hatte, waren wieder alle Unterschlüssel unter „HKEY_CURRENT_USER\Software\Classes“ vorhanden.
Ich vermute das Problem kam dadurch, dass jemand eine etwas betagte Software als Domänen-Administrator installiert hatte. Ich bin froh, dass es jetzt funktioniert.
Dieser Artikel hat mich auf die richtige Spur geführt, deswegen möchte ich ihn hier auch nochmal erwähnen:
Troubleshooting the Missing Classes Root Key…
Check if VBScript runs with correct interpreter cscript.exe/wscript.exe
Comments(2)
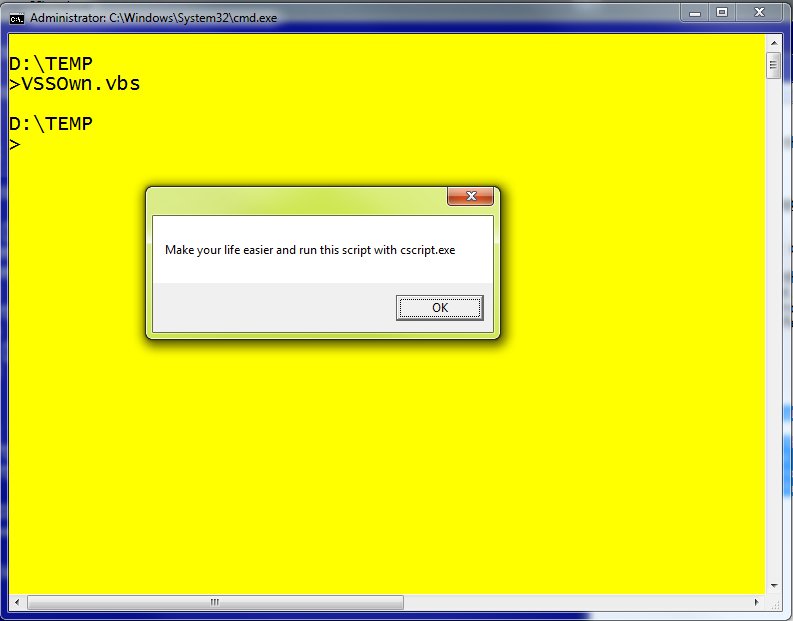
If you ever want to make sure, that your VBScript gets executed with the correct interpreter, just add the following code to your script header:
Set args = WScript.Arguments
‚check if executed with cscript
if UCASE(right(wscript.fullname,11)) <> „CSCRIPT.EXE“ then
‚Thanks to PCFreak from germany for that!
Msgbox „Make your life easier and run this script with cscript.exe“
WScript.Quit
end if
This will prevent the ugly popups! Change „CSCRIPT.EXE“ to „WSCRIPT.EXE“ if you want to check the other way.
Most sophisticated utilman exploit for Teensy and other HID emulators
Comments(2)
 These days it is very cheap and easy to to build your own „evil“ USB-dongle that emulates a USB HID (Human Interface Device) and sends keystrokes. You could use the very easy to program „USB Rubber Ducky“ or the cheaper „Teensy USB Development Board„. So you now have a very nice „Phantom Keystroker“ that you can use for pen testing.
You could find many payloads for the „Ducky“ and also for the „Teensy“ on the internet. For me, the most interesting payload was the „Utilman exploit“ for Windows 7, but I was not comfortable with the way it worked.
- take ownership fo utilman.exe
- change permissons of utilman.exe
- replace utilman.exe with something else (cmd.exe)
A sample payload, that does exactly this can be found here: Utilman Exploiter by Xcellerator for the „Ducky“
This is a huge change to the operating system and you leave your marks on the target system. So how could we do the same without going to deep into the target system? ….. I remembered a registry key that could exactly do that!!!
If you want to run CMD.EXE everytime the system tries to execute UTILMAN.EXE just add the following registry key:
HKEY_LOCAL_MACHINE\SOFTWARE\Microsoft\Windows NT\CurrentVersion\Image File Execution Options\Utilman.exe
REG_SZ: Debugger VALUE: cmd.exe
Now every try to execute UTILMAN.EXE will result in opening CMD.EXE instead. It even works if you type UTILMAN (without the extension).
Based on this knowledge, it is now very easy to write a payload for our „Phantom Keystroker“, that:
- Press WIN key
- Enter „cmd.exe“
- Press „APP“ key
- press „a“ (will do Run as Administrator)
- press „LEFT“ (brings cursor on YES on UAC prompt)
- press „ENTER“ (to open the administrative CMD.EXE)
- enter a command that sets the registry key
- enter EXIT to close the command prompt
This was very easy to accomplish by using the Teensy 2.0.
Here you can download the working exploit for Teensy 2.0 here: Most_Sophisticated_Utilman_Exploit.zip
Here a post in the hak5-Forum with a working exploit for the USB Ruberducky.
The following video will show you how to run CMD.EXE instead of UTILMAN.EXE just by adding a registry key!
Video of a possible attack.
Links
Inside ‚Image File Execution Options‘ debugging
Launching the debugger automatically